TUTORIAL: DEATHLESS
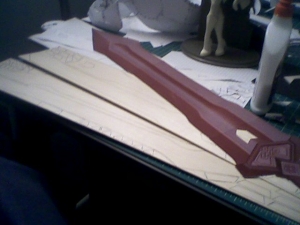
THE SWORD OF THORIN

Step 1: Planning
This will be my first sword build, so much of my initial build time was trying to figure out how to even start. Like every other project, I started with a template. Instead of sketching and building a template from scratch, I found a diagram online and printed it to scale. This took a bit of trial and error while I was guessing the dimensions.

Eventually, I was able to print it out to a size that seemed to look right, or at least where the handle seemed to fit my hand correctly. From that point on I began tracing and trying to visualize how the parts lined up for the depth of the template. There was a lot of guesswork, but eventually I started to make progress on the larger chunks of the build.
The sword was divided into three main build sections. Each of these sections would be built out of wood, using sheets and dowels in varied places depending on the requirements of the sections.
Step 2: Building the Blade
The blade itself has a hole in the center near the hilt as part of the decorative design. This was going to be a tricky section to build around, but ultimately was solved using water and the natural curve of the wood grain. Most of this section was built using pine wood, which in thin layers has a softness very much like balsa wood. It’s a little more tough, though, but not by a whole lot. It’s not as prone to just flaking apart, but pulls apart very easily along the grain. The grain issue is something you have to be very aware of as it can bend easily across the grain, but only in that direction. Too far, and it snaps just like balsa.

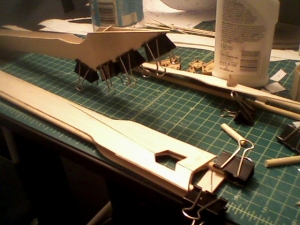
To get around the issue of the hole in the blade near the guard I used a system of dowels while soaking the wood with water.
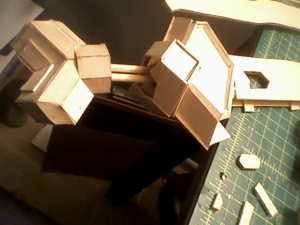
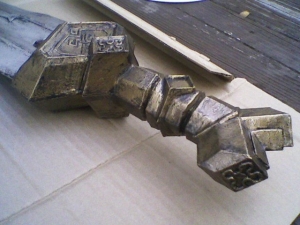
I used two dowels running between the cutouts of the blade, split at the end with the hole cutout. These dowels were covered in glue while in place since these are the main skeleton of the blade. While the pine wood blade was wet I pushed each side together, pinching the center line together so the grain allowed a concave bowing.
You can see the result of this in the picture above, where there are two dowels on the edges of the blade. Those two are glued in place. These are another two dowels on the top and bottom creating the pinched groove of the of the blade shape. This second pair of dowels is not glued, but is heavily clamped in to hold the shape while everything dries.
This is why the wood had to be soaked with water, despite it dissolving the glue a bit. Wood is a lot easier to bend and warp when wet.
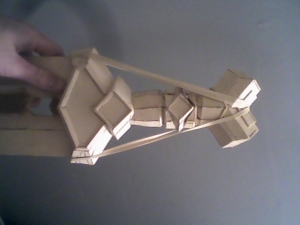
Right afterwards I glued the edges of the blade together to points as separate parts. This essentially gave me three large sections of the blade. A left half of the sword blade edge, a right half, and the center core of the blade.
To moderate success, I used clamps to glue tabs on the inside edges of the center, and later I used office supply binders to glue the tips of all the edges together. I still ended up using a lot of wood filler and sanding, to make the blade shape look solid, and between wet wood and glue the blade developed a small rotational twist.

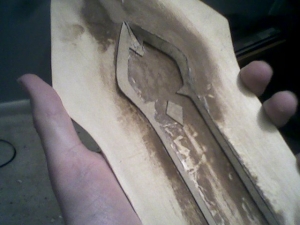
Note: the blade developed a crack as it dried overnight. While frustrating to see happen, it isn’t something that ruins the build. At the end of the construction of the sword a crack like this is something easily patched with wood filler and sanding down to a clean surface.
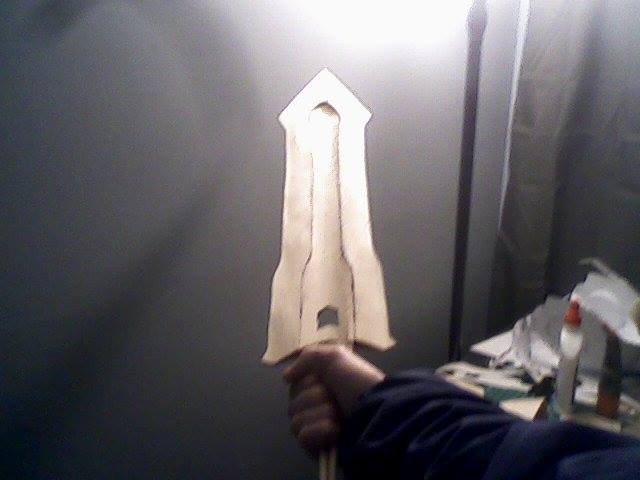
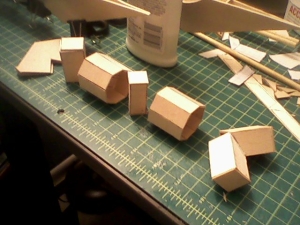
The two dowels from the center extended beyond the blade into where the handle would be along the shaft, which leads to the second section that was built. This second section could be seen as a hand guard of sorts for the sword. It is a large section where a fair bit of detail is shown. Basically, it amounted to large shapes set on various angles. On one side, the blade slid in and met other flat planes, and on the other the handle slides in. This center section is the unifying section between the blade and handle.
Step 2: Building the handle
Finally, the other section of the handle that needed to be built was the handle itself. This section was the trickiest to build over all. On one hand, it had to be the right side for my hand to effectively grip the sword. On the other, it had to fit geometrically in with the rest of the sword. Figuring out the geometry in three dimension from the two-dimensional print out nearly drove me crazy.
The two dowels needed holes drilled through the center section and all the way through the handle section.
Having the two dowels actually worked in my favor. Drilling the two holes through everything made sure that not only would everything be pulled together, but that they wouldn’t spin around a central axis when glued.

Step 3: Total Assembly
After each of these sections were finished as far as I thought I could progress, I poured wood glue in and pushed everything together. Again, without clamps that would work right I ended up strapping rubber bands around each side. Attention was given to make sure both sides had equal tension, since otherwise I would end up with a crooked handle or worse.
I let the whole sword sit for a weekend, just in case. There was a lot of glue inside, and I didn’t want to start working on it in case there were weak sections from undried glue. Once I thought it was good to work on again, I started to go back over sections that had gaps or felt a bit rough. Lots of little bits of wood were cut out and glued into sections, trimmed flush to the geometric planes of the handle, and sanded.
There was a lot of patching and sanding over many of the sharp angles. I’ll admit that not all the facets of the sword hilt came out right, but I worked the surfaces back and forth so much I felt alright to proceed.

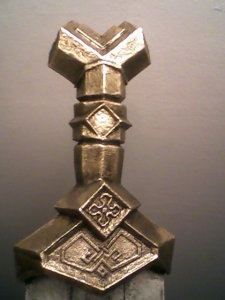
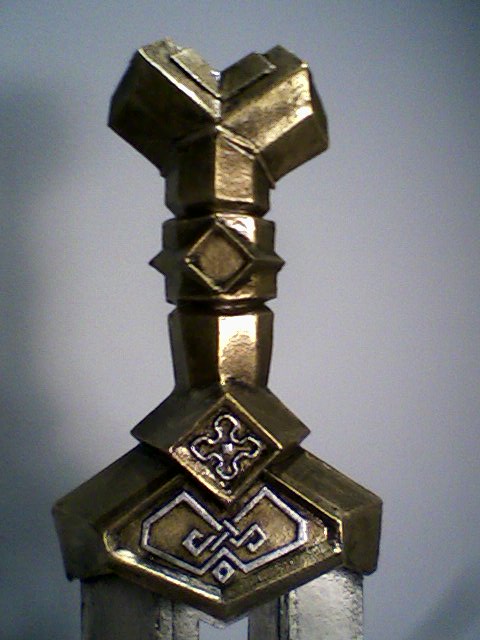
Once everything was patched and sanded it was time to start adding the embellishments to the sword. While letting everything dry, I had gone back to the big template I had printed out, and using my lightbox I started to trace the details out on another piece of paper. Specifically, there was some knot work on the guard, and line work on the blade itself. After tracing them out on paper and cutting them out as new templates, I traced them out on cardboard. The idea was that they would provide a little bit of relief from the surface, but not a great amount. Just enough to paint cleanly, and give a little depth at the same time.
All of these cardboard details were simply glued on with PVA glue. They were gently pressed into place to make sure they were set right, since clamps couldn’t reach into the areas and were possibly too strong to be used without crushing everything.
Careful observation of the original prop also reveals that in the tiny diamonds of the hilt, and the rear split tail of the hilt, also exist a variation of the knot work throughout most of the dwarven designs from the movies. This is much smaller, and cardboard would only be used for the center diamond in the pattern. Easy solution was using a twisted thread, soaked in glue, and using a molding tool to position the thread around in the squarish shapes you see in pictures. It may not look right up close, but hopefully it works from the 5 foot distance mark for details.
Step 4: Painting
Once everything was detailed, dried, and cleaned as best as possible I started to spray the whole thing down with black plastidip. As soon as the first layer was on I started to notice problems with small defects showing through the thin layers.
Plastidip spray creates a very thin layer while it seals, so every rough patch or exposed wood grain texture shows up. To effectively cover the whole sword well enough to hide any of this texture I was going to have to use a lot of product. On top of that, some of those problems couldn’t be hidden by how well it was being coated since the spray wasn’t reaching some of the places.
It was then that I remembered I had a can of liquid plastidip from years ago unopened. This seemed like as good as any time to finally use the stuff. As I started to paint it on I started to have regrets, since it was much thicker than I expected. Brushing it on was like painting with tar, and I fear I may have made a mistake using the stuff.
After both sides had cured from the liquid rubber, I noticed that a good bit of the edges had beaded up from drips, so much of the corners and edges had to be drawn back over with a blade. This took forever, since I kept finding more and more spots that needed attention.
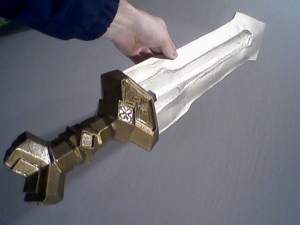
Finally, I felt right enough about the sword that I started to consider painting everything. Even though the sword was already black from the plastidip, I spraypainted the whole thing matte black. Afterwards, it was spraypainted in several stages using simple templates. The blade was all silver, and the handle was brass. Afterwards I followed with painting by hand the silver embellishments, and then made a thick black wash and painted the whole thing with the wash. I wanted to make sure the wash brought all the little details out, and darkened the whole sword.
This wash wasn’t anything fancy. I simply took a tube of generic black acrylic paint from a local craft store and blobbed a pool out onto the cardboard I was using to save the deck from overspray. I would dab a little onto a paper towel, and rub it all over the surface.
The wash darkened everything a little too much, but that was kind of by design. The plan was to follow back over with similar colors and brush the colors back into place by hand, and then another later that highlights some of the edges. This is the same general painting scheme I apply to everything I paint – base color, followed by wash, touch up base, and then highlights.
The recoloring of the metal sections to make them pop color-wise was using the same technique as how I applied the wash, but with more control. I took the same brass and silver spraypaint, and sprayed pools of color onto the cardboard. Once again, used a paper towel as my brush. While the spraypaint was still wet I used the paint on the paper towel to buff the corners of each area, controlling where it goes as best as possible. After I touched up the brass sections, I then used the same technique with a gold spraypaint to give the handle area a polished/worn look.
I later took a basic silver acrylic hobby paint and brushed it over the details on the handle, just to bring out the details.
Since this piece was planned to be used a little roughly, I then sprayed a clear coat over everything to try to lock all the paint in under a hard coat.
* GOTHAMCITYRD can be found on Facebook.