NATIONAL NOVEL WRITING MONTH:
Setting up the Software
AMBER LOVE 30-OCT-2017 Posts like this are first read by the generous supporters at Patreon.com/amberunmasked. Consider adding to my tipjar so I can afford things like paying my car insurance and website expenses.
SCRIVENER
Scrivener has been “go-to” software for several years. I have Windows and know that the Mac version does have slight differences. It seems most official tutorial videos are done on Mac. If you participate in NaNoWriMo, Scrivener is one of many partners to offer deals. For October and November, it’s free; in December it’s half off. It’s worth it! To find out more, go to the NaNoWriMo forums > Official Stuff > Special Offers and Greetings, etc. I have Version: 1.9.7.0 – 06 Oct 2016 and when I click on Help > About > Check for Updates, it says I’m up to date.
The first thing you want to do for NaNoWriMo specifically, is download the template. It’s free. It automatically sets a Daily Target sheet to 1,667 words for the day which you can right-click and duplicate for 30 days. The first sheet displayed as a default may not be the one with the target set. On the folder “Chapter” you can right click > Add > New from Template > Daily Target (you’ll also see the Character and Setting templates here in the sub-menu).
You’ll also want to go to Project > Meta-data Settings > Project Properties and fill in the basics about your manuscript. Then get ready for the nitty-gritty. In the Meta-data window, click on the first tab “Labels” and you can customize all of those colored labels. Here’s what I did:
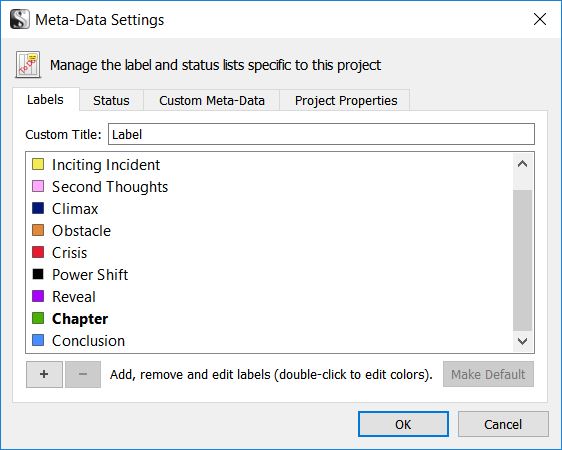
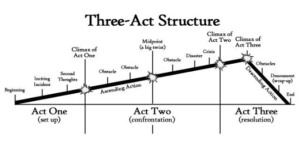
The reasons I chose those specific names for my labels is because I use a combination of other writers’ guidelines for a three-act story structure. One of the guidelines which is the three-act structure at its most basic I found through a basic Google Image Search; there are tons of variations. But you’re not thinking about the plotting now. Pulling the graphic into Scrivener (you can drag and drop to the Research section) is to have it ready to go.
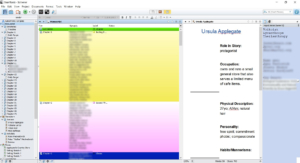
Before I can dive further into plotting and the structure, I need things like characters and settings. There are template sheets for those as well in the linked NaNoWriMo template. You can probably find even more things to add to the character sheets by looking at other blogs and tips. A good premise is to think of it as designing an RPG character, but you’ll want even more information that readers will never even know about. Below, I show what the Excel file I’m using in conjunction with Scrivener offers which includes a character sheet template.
Tip: You can have multiple instances of Scrivener open and drag and drop items like the character or setting sheets from the NaNoWriMo template to whatever style Scrivener project you are working on.
With the Scrivener NaNoWriMo template file, I click on one sheet and then right click > duplicate. I also organize my sheets into a typical “file tree” structure. In previous books, I’ve done Main Characters (which are characters that recur from book to book in my Farrah Wethers series); and then had Police with their own character sheets below. For 2017, since I’m not doing a mystery, I have characters broken human and the other race I’m including, shapeshifters.
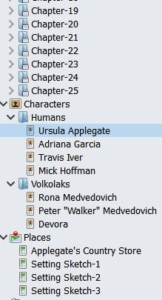
For settings, I haven’t needed to organize them in a more comprehensive file structure so I keep all of the setting sheets at the same “branch” level which by default is called Places.
The final prep I do in Scrivener is saving my working layouts. When I’m outlining, I usually want to see the corkboard and have the other editor for toggling around characters and settings. I also keep the Inspector open so I can paste things into the Project Notes (usually so I don’t forget how to spell something or for a URL I may visit often). For detailed research and notes, I make sheets under Research and write up a summary, paste notes from websites with the URLs, and random notations.
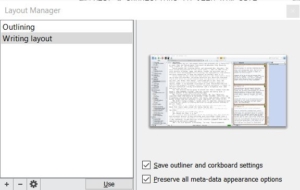
If I’m viewing the layout I want for outlining, I then go to Window > Layouts > Layout Manager. Check the two options for saving what to include. Then click the Plus sign at the bottom left of the window and give your layout a name. Close out of the Layout Manager then set up Scrivener how you want it for your writing mode.
I like to have a Daily Target sheet on the left and use the right the same way I do in outlining. The right side editor for me is to look up whatever I need in the Scrivener project without having to leave the current working document which is on the left. I have my act structure image on the right or notes or toggle between characters. I have that layout saved as Writing Layout. The primary difference for me is that in outlining, I want to see my corkboard index cards; and when writing, I want a daily target sheet open.
Scrivener has a view called Outline, but you have to make sure you have the proper level of your file tree selected. I can click on Manuscript in the Binder, then View > Outline since I have my outline done (above).
EXCEL
That’s my Scrivener setup! Now on to my new integration with Svenja Gosen’s Excel spreadsheet template. I had previously only used this for the word tracking. This year, I’m incorporating a little about the characters so that I can use the Timeline feature. First, thank you to Svenja Gosen for making these files. They are “pay what you can” on Gumroad. She has a variety of themes from LOTR to Justice League. I chose the first one under original art which is purple/pink and mountains. When you download the file, the first sheet is instructions so I don’t need to get too specific here.
![]()
![]()
Click on the Word Tracker tab and double-check that the dates are for November. Click on the Novel Info tab and fill out that basic information like you did for Scrivener (title, author name, etc.). Then you can fill out Characters, Chapters, Scenes, and Plot Sheet. Once you have characters filled in on the character list, it will automatically populate the Timeline sheet. This is a valuable tool and what I’m going to test out this year.
I can have a day set up on the Timeline sheet where I know exactly where my characters are. Protagonist and reporter are arguing in protag’s apartment; next column over for that same day, local politician shows up at a rally. And I can tackle it as the day’s events for all of them or just the ones with key movements. Svenja has example sheets filled out for Timeline, Plot, and Characters.
![]()
My favorite part of this Excel file is the same as in Scrivener: progress charts! I love to see that I’ve accomplished something on a given day. It helps keep me going. As you fill out the word tracker sheet every day, the pie chart at the top will update and the bar graph on the Progress sheet will update.
That should be enough set up to have your brain swimming for now.


1 Comment on NaNoWriMo2017: setting up software
Comments are closed.